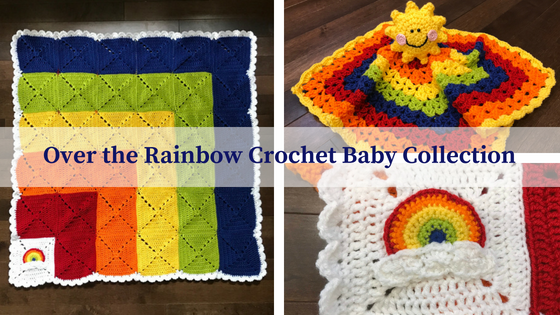
 This rainbow crochet baby collection contains a piece of my heart in every stitch. My rainbow baby will be entering the world sometime in the next few weeks and I wanted to make something really really special to adorn his crib. I’m super excited with how this collection turned out and I had a lot of fun making it!
Because these pieces were created for a baby boy, I used bright, primary colors, red through blue of the spectrum. If you were creating this collection for a girl, you may want to experiment with including a lovely dark purple, or fun pink as well! You could also try pastels for a completely different look. That’s one of the joys of crocheting; you can make a piece your own by making a few simple tweaks!
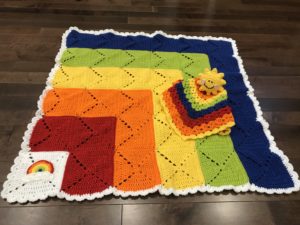
BABY BLANKET
The blanket is an original design utilizing some great online inspiration. It is comprised of a collection of solid granny squares, which are my favorite type of granny square! I think they look very rich and I appreciate that you’re not left with large holes like with a traditional granny square. The border is made up of shell stitches to mimic the clouds in the rainbow applique. The applique comes from a fun Pinterest find that I modified slightly for my purposes.
Materials
Worsted weight yarn:
I Love This Yarn in White, Red, Yellow, Keylime, Royal
Red Heart Super Saver in Pumpkin (I wanted a really vibrant orange and couldn’t find anything in the ILTY collection at my Hobby Lobby that fit the bill.)
5.5 mm crochet hook
4.5 mm crochet hook
Scissors
Yarn needle
Steps
- Using I Love This Yarn and a 5.5 mm I crochet hook, create a series of solid granny squares in the following numbers and colors. Check out Moogly for an excellent tutorial on this type of granny square.
1 White
3 Red
5 Orange
7 Yellow
9 Keylime
11 Royal - Join squares using an invisible join method. There are many types of invisible joins, but I prefer using a slip stitch. Whenever possible, I like to stick with my trusty crochet hooks and minimize my use of yarn needles, which always seems more tedious to me. Check out the last few minutes of Melanie Ham’s traditional granny tutorial for a good example of this type of join.
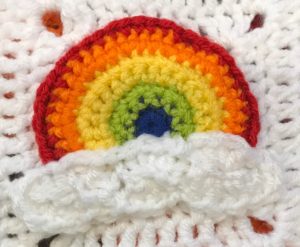 Create rainbow applique by following instructions on the Repeat Crafter Me site. I used a 4.5 mm hook and the same colors that I used for my granny squares. I modified the pattern slightly, adding two rows each of single crochet for the Keylime, Yellow and Pumpkin rows, just because I wanted them to stand out a bit more. This made the rainbow a little more C-shaped, but I just covered that up with the clouds. Then, sew applique onto center of white square using yarn needle.
- Using your 5.5 mm hook, join I Love This Yarn in White (anywhere except a corner) to the outside edge of your blanket, using slip stitch. Single crochet around entire perimeter, putting three single crochets in each corner. I used two double crochets in the chain two spaces at the corner of each square, since those spaces are larger and tend to curve down a bit. This helped to level out the top edge before adding the shell border.
- Continue on, adding shell border to top of single crochet edge. This Blossom Crochet tutorial is helpful for learning this border stitch.
- I never block my crochet pieces, but because this one is comprised of so many individual blocks, I decided to do so just to make it as even and squared up as possible. I laid my piece on a large table, sprayed with water until the yarn was saturated, but not overly wet, then I gently pulled on edges and patted down bumps and ripples until I was satisfied. Then, just let the piece air dry overnight and you’re all set.
LOVEY
This lovey worked up quickly and is SO CUTE. I used a smaller hook size than called for because I wanted to minimize the size of the gaps. I also modified the face of the sun to give it more of an amigurumi look, and I’m super excited with how it turned out!
Materials
Worsted weight yarn:
I Love This Yarn in Red, Yellow, Keylime, Royal
Red Heart Super Saver in Pumpkin
Caron Simply Soft in Soft Pink, Black
4.5 mm crochet hook
2.5 mm crochet hook
6 mm safety eyes
Fiberfill stuffing
Scissors
Yarn needle
Steps
- Using a 4.5 mm crochet hook, follow instructions for “You Are My Sunshine Lovey” found on Cre8tionCrochet website, using the Red, Pumpkin, Yellow, Keylime and Royal yarn colors used in the Over the Rainbow blanket. I didn’t follow the row counts exactly but used a Red-Pumpkin-Yellow-Keylime-Royal-Red-Pumpkin row pattern with Yellow for the border.
- Still using your 4.5 mm hook and Yellow yarn, follow the instructions for creating two sun shapes (minus the face and joining instructions, which I modified.)
- Create two cheeks using 2.5 mm crochet hook and Caron Simply Soft in Soft Pink. Create a magic circle with 6 single crochets in the circle, followed by second round of two single crochets in each previous stitch (12) and finish off. Sharon Ojala’s magic circle tutorial is the only one that has ever made sense to me, so I highly recommend checking it out!
 To create the face of the sun, attach two 6 mm safety eyes, sew your pink cheeks onto the sun and sew a simple mouth using Caron Simply Soft in Black.
- I didn’t want to lose the cute, pointy, sun rays by sewing the two suns right sides together, which would round them out, as the pattern calls for, so I simply placed the wrong sides together and whip stitched with yellow and a yarn needle around the two pieces to join. I stuffed as I went, making sure to use a pencil to push some stuffing into the rays as well.
- To attach the sun to the blanket portion of the lovey, I used the Red yarn to attach the bottom of the outermost ring of the backside sun to the inner red square of the lovey. This way, the sun sits very securely on top of the lovey, without squishing any of the rays. You’ll want to sew it on nice and tight, since this will be a snuggle toy, hopefully loved for years to come. Don’t worry; if you’re careful, the stitches don’t show at all, even against the yellow sun.
If you decide to make either of these pieces I would LOVE to see! Please share your comments and pictures and let’s keep the inspiration and creativity coming!