I’m going to be a great aunt! (“Grant?” Not as cool as “Gruncle…” I’ll work that out later.) My nephew and his wife are days away from having their first baby and I honestly feel like one of my own kids is having their first. So! Excited! As I’ve mentioned before, my family is blessed with more Y chromosomes than some days it feels like we know what to do with, but this little love is a baby girl. So I finally (finally!) got to design something girlie!
BABY BLANKET
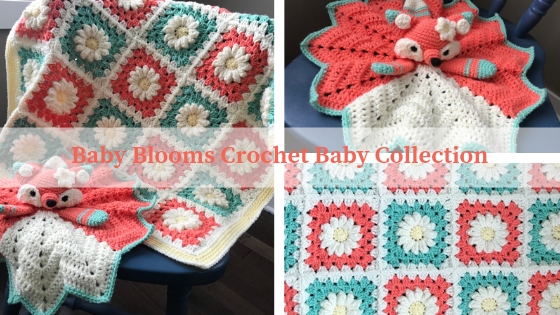
My Pinterest crochet board has been crammed with flower granny square designs for years, so I was thrilled to finally be able to make one! There are many styles for this type of blanket, but I love the dimension found in this daisy design. The blanket is based on the design found here on the Color ‘n Cream blog.
You may notice the colors aren’t typical for a baby girl, but daddy loves orange and momma loves green, so I chose softer, more fruity versions of those colors with smooth muted tones for the flower centers.
Materials
Worsted weight yarn:
I Love This Yarn in Ivory, Buttercup, Mango, Ocean
4.5 mm crochet hook
Scissors
Yarn needle
Steps
- Using a 4.5 mm crochet hook, create 25 daisy granny squares, alternating Mango and Ocean for the surrounding square. My design features 13 Mango and 12 Ocean.
- Join squares using the join-as-you-go method. This was my first time using this type of method, but it worked great for this project. Check out Bella Coco’s tutorial for this type of join. She does a beautiful job; plus I could listen to her talking about things being “a bit fiddly” for hours! To create this type of join I added another round of granny shells in Ivory to each square.
- For the border I created one row of single crochet in Ivory around the entire piece, followed by three rows of single crochet in the back loop only in Buttercup and a final row of singles in Ivory. I love the way back loop only single crochets look in a border because it creates a simple, clean frame that looks polished without being overly fussy. Keeping this border simple was especially key on this design, since the flowers have so much detail and dimension that I didn’t want to compete with the border stitch.
LOVEY
The internet is full (full!) of free crochet patterns, so I never upgrade to or mess with purchased patterns. But, my nephew loves foxes and the nursery is sporting a woodland theme, so I had to find the perfect fox. I broke my never-pay-for-patterns rule and bought the plans for this “Acorn Fox Lovey” from Miranda Hoover’s Woolen Yeti site on Etsy. She has an entire series of animals based on this pattern, all of which are completely adorbs.
Materials
Worsted weight yarn:
I Love This Yarn in Ivory, Buttercup, Mango, Ocean
Caron Simply Soft in Black
4.5 mm crochet hook
3.5 mm crochet hook
3.0 mm crochet hook
10.5 mm safety eyes
Fiberfill stuffing
Scissors
Yarn needle
Steps
- Follow the pattern from Woolen Yeti for all parts of the fox lovey. I did not crochet the eyes, but chose to use 10.5 mm safety eyes instead. I use the same yarn colors found in my blanket for a cohesive look. The pattern noted that stuffing the arms and tail was “optional”, so I left mine flat. I did include a bit of stuffing in the nose part 1, though, to ensure it stood up and kept its shape.
- To give our little woodland friend some extra girlieness (seriously, I never get to crochet girlie things!!!) I created a small daisy to accent one ear. I followed the same stitches as the daisies in the blanket, but used a 3.0 mm crochet hook, a 7 sc magic circle and 7 petals of double crochets. I love how it turned out and also like that it’s another subtle way to tie these pieces together as a collection, rather than separate pieces.
If you decide to make either of these pieces I would LOVE to see! Please share your comments and pictures below or on my Facebook page.


